Skyrockit Setting the Stage
Learning objective: By the end of this lesson, students will be equipped to conceptualize and outline the foundation of a web application, focusing on data structure, user stories, and routing.
What we’re building - Skyrockit: The Ultimate Job Tracking Application
In this lesson, we embark on an exciting journey to build “Skyrockit,” a comprehensive job tracking application. This platform is designed to empower users by allowing them to easily track and manage the status of their various job applications. With Skyrockit, users gain greater control and visibility over their job search process, streamlining the often overwhelming task of managing multiple platforms.
Shaping the data
The foundation of any complex application lies in how its data is structured. For Skyrockit, our focus will be on creating a well-defined schema for “job application” data. For this build, we are choosing to embed our job application data directly within our user model. This approach not only simplifies the data architecture, but also improves performance by making data retrieval more efficient.
Establish our User Stories
One of the key steps in developing an intuitive and user-friendly application is to clearly understand and outline what our users need and expect from the platform. To achieve this, we will begin with the process of writing user stories.
These narratives will serve as a roadmap, guiding our development process by laying out each action and feature our users expect within Skyrockit. User stories will be written in non-technical language, focusing on the user experience rather than the underlying code, ensuring that our design is aligned with user expectations and requirements.
By carefully planning our data structure and user stories, we set the stage for creating an application that is not only functional but also resonates with the needs of our users, making their job tracking experience seamless and effective.
The following are some examples of user stories we can write for our Skyrockit app:
As a user, I want to be able to add new job applications that I’m thinking about applying to or have already applied to. For each job, I should be able to note down important stuff like the company’s name, the job title, what stage the application is at, and if I want, some personal notes and the link to the job posting. As a user, I want to see all the jobs I’ve applied for in one place. This page should just show the job title and the company name for each job to keep it simple and easy to look at. As a user, I need to be able to click on any job in my list and see all the details about it on a new page. This includes everything I’ve recorded about that job application. As a user, when I’m looking at all the details of a job application, I want to be able to change any of the information. There should be an easy-to-find link that takes me to a different page where I can make these changes and then save them. As a user, if I’m looking at the details of a job application, I want a simple way to delete it completely, like clicking a ‘Delete’ button.
You might notice that the above user stories give us a good idea of what CRUD functions a user might want to perform on our applications. Also, take note of how our first user story gives us some context as to how we might structure our data (“company name”, “job title”, “status”, and optional “notes”) While these categories may not be the final names we give for data in our schema, they give us a high level guide we can refer back to when making decisions about how we structure data.
Planning the routes
Let’s go ahead and establish the RESTful routing for app:
| Action | Route | HTTP Verb |
|---|---|---|
| Index | ‘/users/:userId/applications’ | GET |
| New | ‘/users/:userId/applications/new’ | GET |
| Create | ‘/users/:userId/applications’ | POST |
| Show | ‘/users/:userId/applications/:applicationId’ | GET |
| Edit | ‘/users/:userId/applications/:applicationId/edit’ | GET |
| Update | ‘/users/:userId/applications/:applicationId’ | PUT |
| Delete | ‘/users/:userId/applications/:applicationId’ | DELETE |
Note: We are including the userId in the route since we are nesting our applications within the user object.
Create an ERD
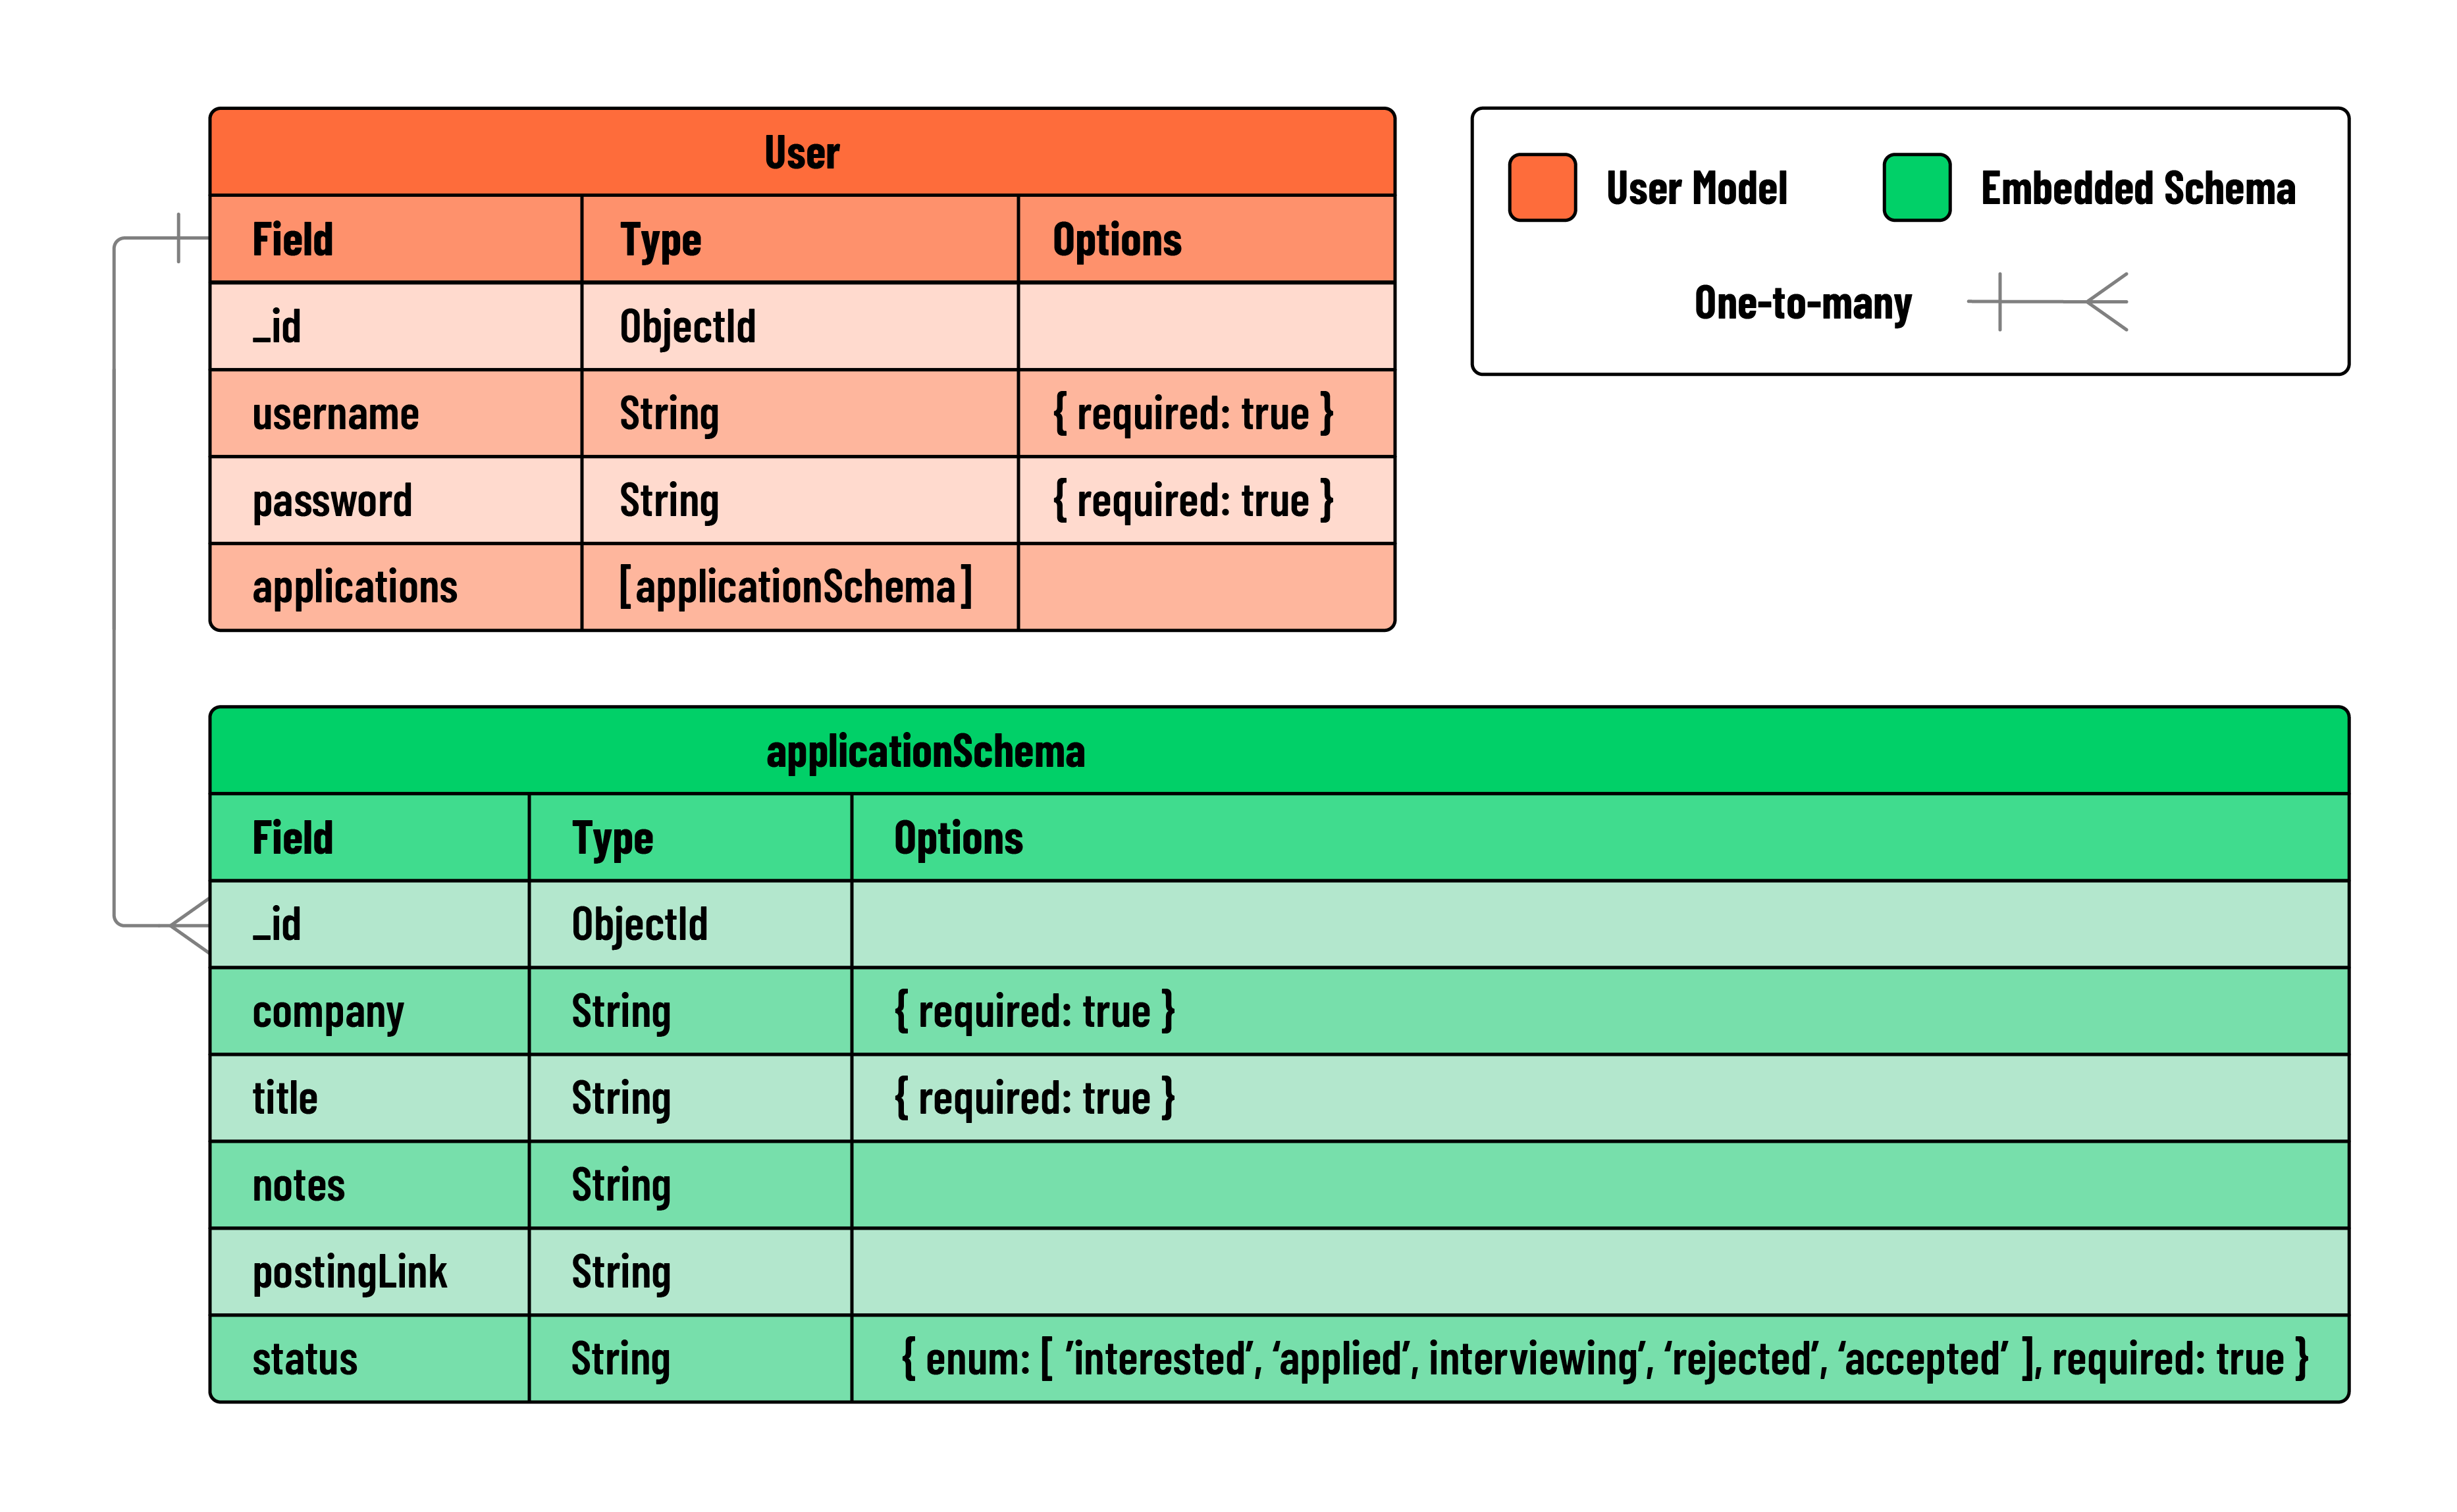
After we’ve nailed down our user stories, our next step is to map out our data’s structure. For this, we create an ERD, or Entity Relationship Diagram. This visual tool will chart out the names we’ll use for our data properties, the types of data we’ll be working with, and how different pieces of data are connected.
An ERD is like a blueprint for your data. It doesn’t involve any coding, but it’s essential for planning and understanding your data’s layout, both for you and anyone else who works on the project. As your application evolves and becomes more complex, you can update the ERD to keep pace. It’s a living document that guides you through the development journey, ensuring you and your team always have a clear picture of how your data is organized and connected.
Below is an example of the ERD we will be using for Skyrockit:
Embedding data
In our ERD, we’ve opted for an embedded relationship model, where the job application data is directly incorporated into the user model. This approach was intentional because it makes data retrieval much easier in our application. By embedding the application data within the user’s document, we minimize the need for multiple database read operations. Since users are already logged in, their associated applications are embedded within their own user document.
This embedded model enhances performance by reducing the need for extensive database queries. It’s a strategic decision that aligns well with the typical flow and structure of our application.
For those curious about the nuances between embedding and referencing data in MongoDB, and when to use each approach, consider exploring this informative article. It offers a deeper dive into data modeling strategies, helping you make informed choices in your MongoDB schema design for future projects!