Installfest - Python Programming Live Online
Windows Instructions
Last updated: January 10, 2020
It’s not easy to get your computer ready for programming, especially for Python. If one does not take great care with building their Python programming environment, this can easily happen, as illustrated by the great XKCD:
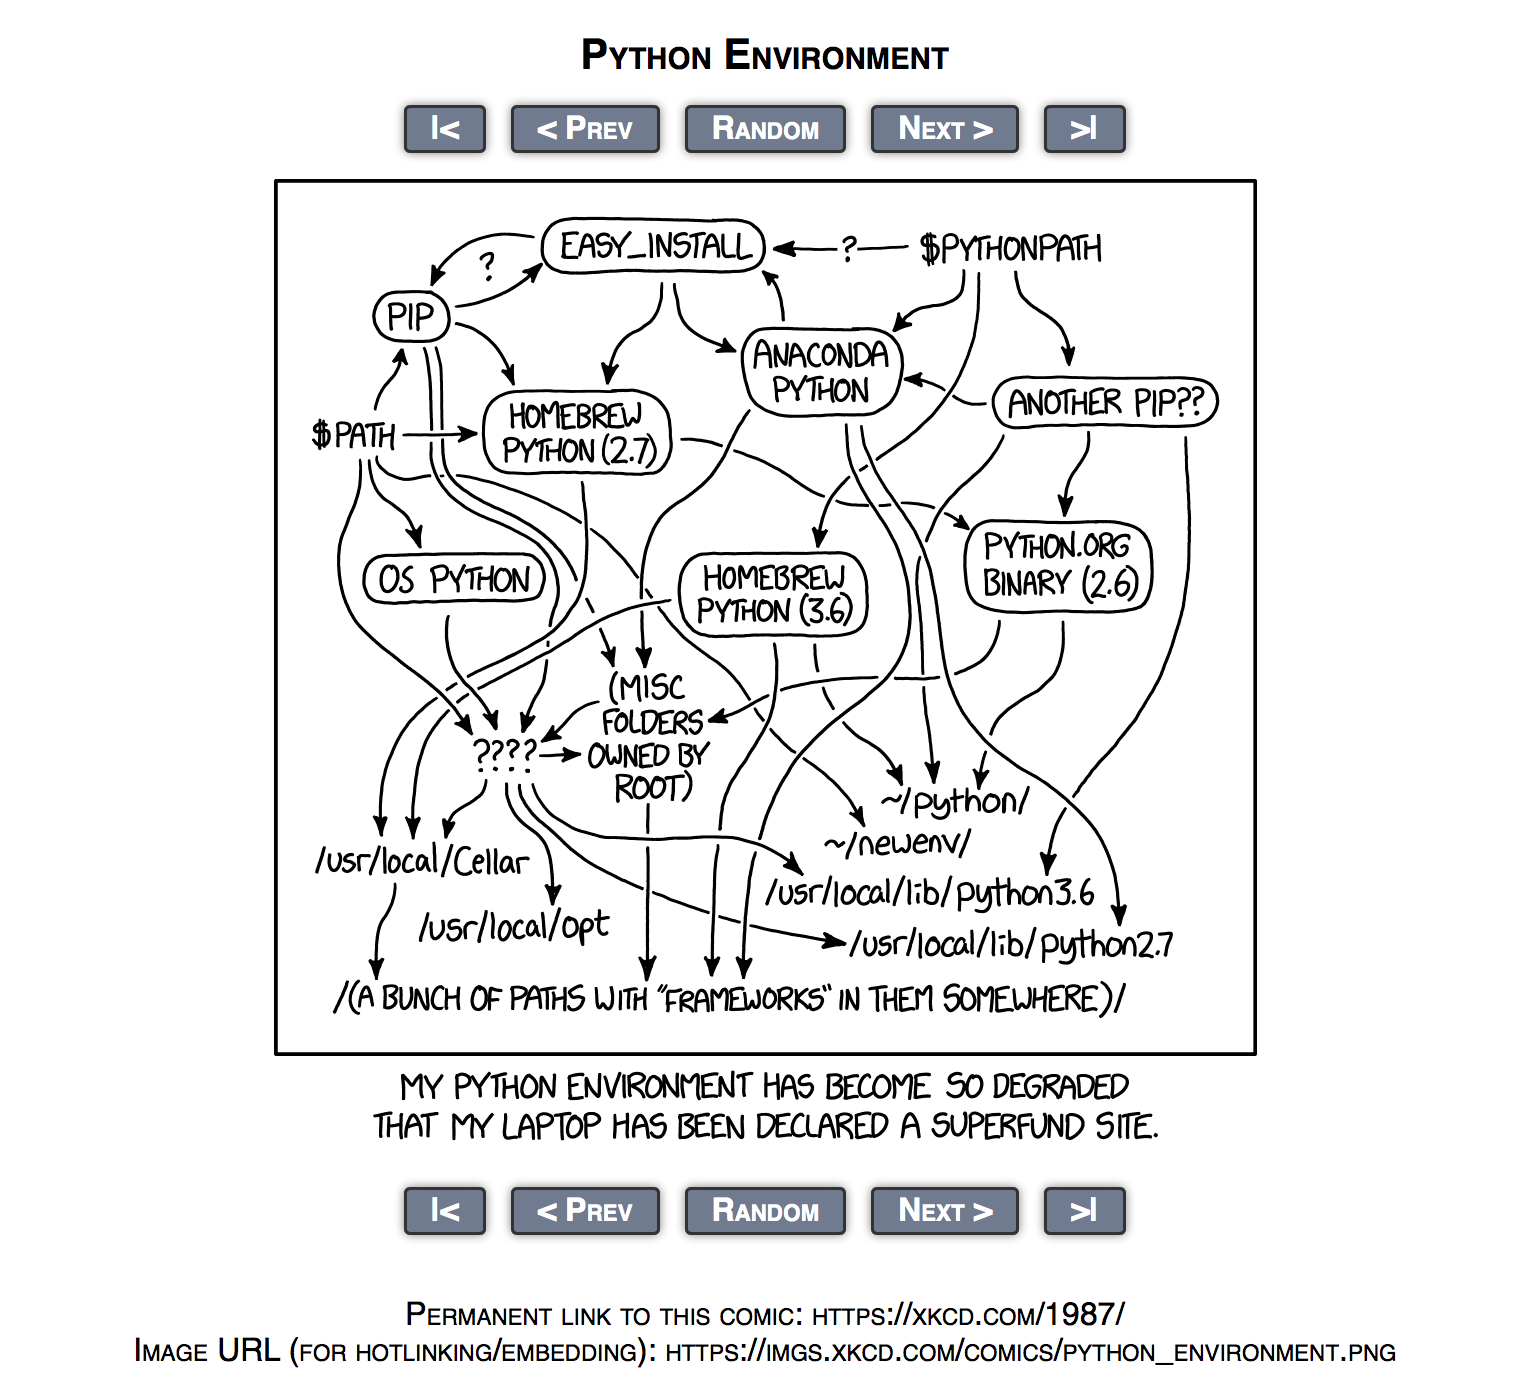
Unfortunately this process can be bewildering for a beginner. Luckily, you are not on your own!
There are many amateurish ways to install Python but in this course we will install Python in the most modern and professional way – that is, how it’s installed at actual companies that use Python as their primary programming language!
The Importance of Reading
A word of advice as you progress through this installation guide: Please read every section before typing anything in – I promise that will prevent a lot of pain!
Technical Requirements
This guide is written for Windows 10 (64-bit). Previous generations of Windows are not supported for this course. If you are running an older version of Windows, you must upgrade to Windows 10 before proceeding.
Did you notice we said 64-bit? This may be the first time you’ve heard of the concept of “64-bit”.
A bit of background without getting too technical:
- It’s kind of ridiculous, but Windows 10 comes in two flavors: 64-bit and 32-bit
- The 32-bit flavor of Windows 10 is meant for older machines. It is too outdated and won’t work for us!
- The good news is: if your machine is fairly new, you probably have the 64-bit flavor of Windows 10, unless a mistake was made in the original installation process
-
Check what version of Windows 10 you have in Settings
 System About Device specifications
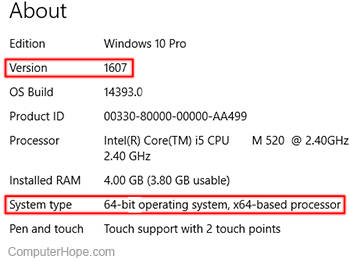
-
System type should say “64-bit operating system, x64-based processor”
- If your machine does not have the correct System type,
 STOP HERE and contact your instructor for help
- If your machine does not have the correct System type,
-
Version should be 1607 or greater
- If your machine has a Version number less than 1607, please fully update your machine with Windows Update. The required software will not work on older versions
-
Administrator Privileges Required
You need Administrator Privileges on your machine in order to install software.
If you don’t have administrator privileges (if you are using a work machine, for instance), you will need to speak with your employer about granting you permission to install developer software on your machine, so that you are able to complete the course.
Install Linux Subsystem
Now that you’re fully updated, we are going to install a Linux Subsystem into your Windows machine.
Linux Background
We are not going to go into a lot of technical detail here, but basically the world of Operating Systems (OSes) can be split into two styles: Unix-style (Mac/Linux), and non-Unix style (Windows).
It’s a reality that many professional programmers prefer Unix-style OSes for programming (unless your job is to actually to build Windows-specific programs, of course).
-
The simple explanation is that Unix-style OSes are fundamentally built for the the purpose of programming, where the programmer experience is the top priority. (See the Unix Philosophy).
-
Whereas Windows (which is not Unix-style) is built for general purposes (like office tasks and games), so the general public experience is the top priority, not programmers.
Luckily, in recent times Microsoft has clued in to programmer needs, and implemented a feature called Windows Subsystem for Linux (WSL) in the most recent Windows 10 updates.
WSL allows programmers to install a Linux Subsystem into their Windows machine, which gives them all of the advantages of a Unix-style environment, while continuing to run Windows!
This is a game-changer, and many professional programmers who are stuck with Windows computers are now starting to use this type of setup.
It also helps our course a lot, as for a long time it was not possible to properly support students using Windows. With WSL, it becomes possible to do so, for the first time.
Installation
We will install the most popular version of Linux, called Ubuntu.
Please follow this guide on installing Ubuntu on Windows, written by linuxhint.com.
Before proceeding, take note of the following:
- Install the latest version of Ubuntu (18.04 LTS) even though the (slightly old) guide goes through the installation of an older version (16.04 LTS).
- When it asks you to decide on a new username, use one without a space! (Example:
jane, notjane smith) - When it asks you for a new password, you can use the same one you use for Windows (or a new one), just make sure you write it down somewhere so you remember what it is!
-
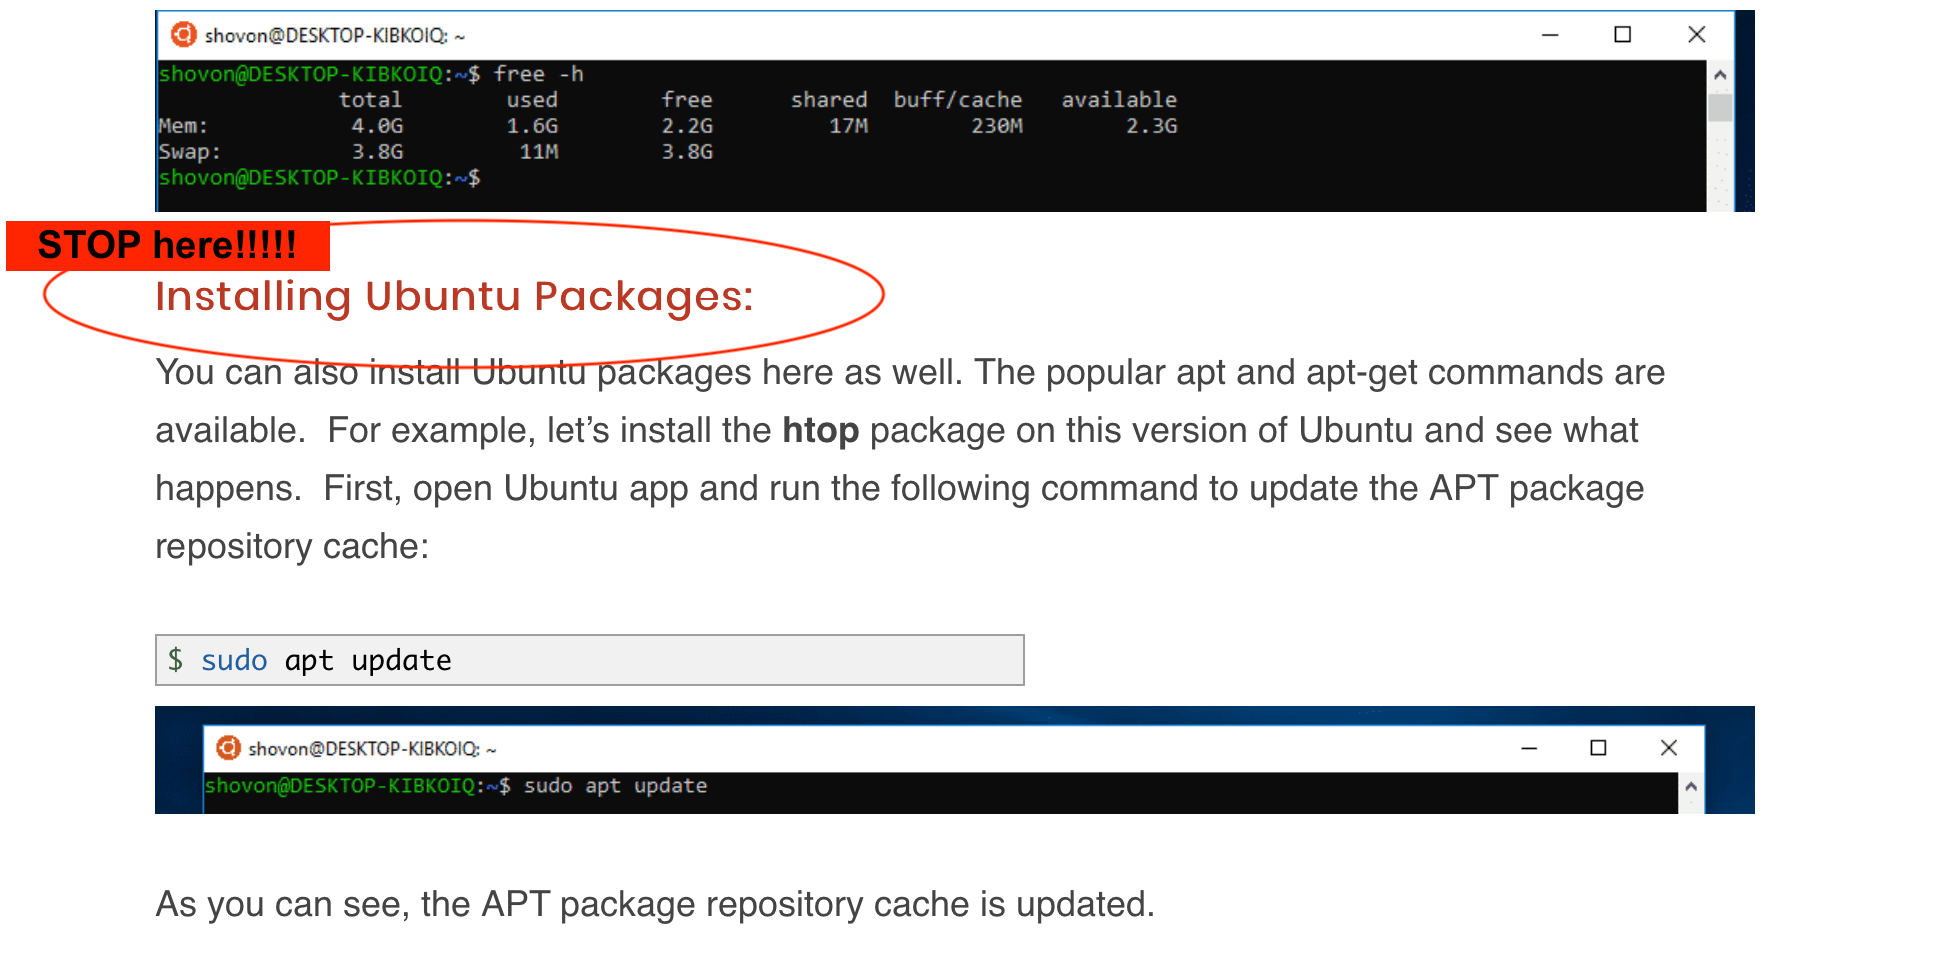
STOP with following the guide when you get to the Installing Ubuntu Packages part. Come back to this page and continue from the “Enable Cut-and-Paste” section just below
Now, open the guide in a new tab/window and proceed with the installation.
Once it’s installed, open the Ubuntu app.
From now on we will call this app the Terminal.
Enable Cut-and-Paste
To enable cutting and pasting into the Terminal, click the Ubuntu logo in the upper left corner and select the Properties menu item.
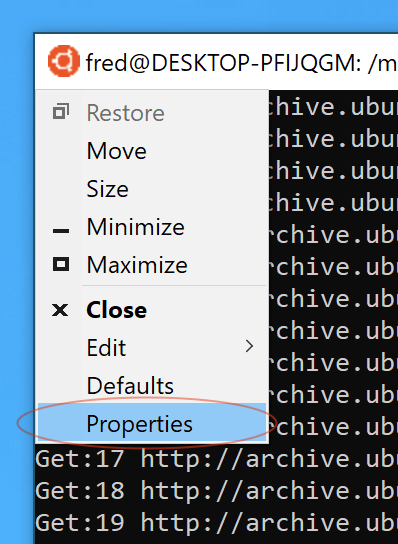
Then, put a checkmark next to “Use Ctrl+Shift+C/V as Copy/Paste”.
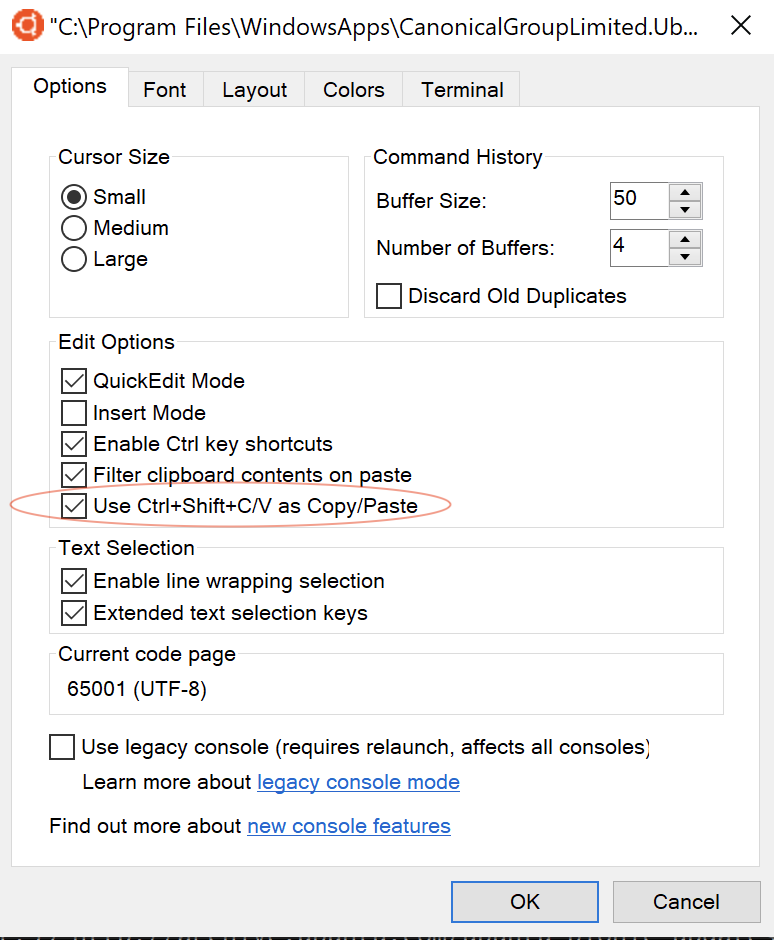
Voila, you can now copy and paste into the Terminal with ⌃Control+⇧Shift+C and ⌃Control+⇧Shift+V.
Code Editor
Finish installing Ubuntu before proceeding with installing the Code Editor, as the Code Editor will not finish installing properly if Ubuntu is not fully installed first.
Visual Studio Code is probably the most popular code editor as of this writing and it is the one we will use in this course.
You can use another code editor if you prefer, but VS Code will be tightly integrated into in-class examples, and it’s free!
Please download and install it now.
Once it’s installed, launch the app.
Important: When VS Code asks you to install a Remote - WSL extension, click Install!

You can close VS Code after the extension is finished installing.
Finally, check to make sure that the code editor is usable from within the Terminal. Open your Terminal and enter the following:
code -v
It should output something like:
1.40.1
8795a9889db74563ddd43eb0a897a2384129a619
x64
It doesn’t matter if the output is exactly the same, as long as it’s similar.
Create a Working Folder
We’ll need a place to do our work in this course.
On Windows, the best place to do it is in the Documents folder.
First, let’s find out your Windows username.
Run the following in the Terminal:
powershell.exe '$env:UserName'
and it should output your Windows username.
If your Windows username somehow has a space in it, ![]() STOP HERE and contact your instructor for help. Programming tools generally do not expect user names to have spaces, and lots of things will break unexpectedly if you try to proceed.
STOP HERE and contact your instructor for help. Programming tools generally do not expect user names to have spaces, and lots of things will break unexpectedly if you try to proceed.
If your Windows username is one word, then you’re good to continue.
Run the next line in the Terminal.
-
Important 1: Every single character is important and must be typed exactly correctly! Notice the two different kinds of quotation symbols!
-
Important 2: CaPiTaLiZaTiOn Matters!
export WINDOWS_USER=`powershell.exe '$env:UserName' | tr -d '\r'`
and then:
cd /mnt/c/Users/$WINDOWS_USER/Documents
Now that you’re in the Documents folder, create a sub-folder for your development activities:
mkdir dev
cd dev
Verify the present working directory:
pwd
It should show something like /mnt/c/Users/jane/Documents/dev (Depends on your own Windows username, of course).
Let’s make a shortcut for this folder:
echo "DEV=/mnt/c/Users/$WINDOWS_USER/Documents/dev" >> ~/.bashrc
source ~/.bashrc
Now, it’ll be easy to get back to your Dev folder anytime by typing cd $DEV in the Terminal. (That command won’t actually do anything for now, because you’re already in that folder.)
Install Programming Tools
Update Your Linux Subsystem
Before installing more stuff, let’s completely update your linux subsystem. Even though you just installed it from the App Store, there will already have been new stuff released since they last updated it on the store!
Open the Terminal and run the following:
echo '* libraries/restart-without-asking boolean true' | sudo debconf-set-selections
It will ask you to enter your password, please do so. For security reasons, you won’t see your password as it’s being typed in, so just be careful about typing it in exactly correctly.
Then:
sudo apt-get -y update
sudo apt-get -y upgrade
sudo apt-get -y autoremove
If it asks you any questions while it’s running, just answer “Yes”.
This may take a while, so feel free to grab a coffee while it’s proceeding.
Git
Check that Git is at the latest version:
git --version
It should output git version 2.17.1.
If it’s not at 2.17.1, upgrade your Git software:
sudo apt-get -y upgrade git
Now set some Git configurations. Replace you@example.com and Your Name with your actual email address and name, of course…
git config --global user.email "you@example.com"
git config --global user.name "Your Name"
git config --global core.editor "code -n --wait"
Pyenv
The most professional Python installation is achieved using Pyenv, as it allows us to avoid version collision problems and upgrade difficulties.
Install Pyenv with the following line:
curl -L https://github.com/pyenv/pyenv-installer/raw/master/bin/pyenv-installer | bash
Now that Pyenv is installed, let’s activate it. This is a multistep process.
First, let’s find out your Linux username. Run this in your Terminal:
whoami
It should output your Linux username. It could very well be different from your Windows username, since we are running Linux on top of Windows!
If your Linux username somehow has a space in it, ![]() STOP HERE and contact your instructor for help.
STOP HERE and contact your instructor for help.
If not, continue with the next commands.
-
Important 1: Every single character is important and must be typed exactly correctly!
-
Important 2: CaPiTaLiZaTiOn Matters!
echo export PATH="/home/${USER}/.pyenv/bin:\$PATH" >> ~/.bashrc
echo "eval \"\$(pyenv init -)\"" >> ~/.bashrc
echo "eval \"\$(pyenv virtualenv-init -)\"" >> ~/.bashrc
source ~/.bashrc
If you experience some error messages here, ![]() STOP AND DO NOT CONTINUE. Ask your instructor for help.
STOP AND DO NOT CONTINUE. Ask your instructor for help.
Install Python
Finally we are ready to install Python!
First, we have to install the prerequisites:
IMPORTANT: This is a looooooooooong line, make sure you copy the entire thing.
sudo apt-get -y install make build-essential libssl-dev zlib1g-dev libbz2-dev libreadline-dev libsqlite3-dev wget llvm libncurses5-dev libncursesw5-dev xz-utils tk-dev libffi-dev liblzma-dev python-openssl
Then, we’ll install the latest version of Python. This will take a few minutes!
pyenv install 3.8.1
We shall set this version as the default:
pyenv global 3.8.1
Check to make sure it’s installed properly:
python --version
It should output: Python 3.8.1.
While you’re at it, upgrade pip. This is a tool we’ll be using to install Python packages later.
pip install --upgrade pip
Check to see that the latest version was installed:
pip --version
It should output something like pip 19.3.1 from /home/jane/.pyenv/versions/3.8.1/lib/python3.8/site-packages/pip (python 3.8).
Install Anaconda
Finally, we’ll install Anaconda, which we will need for the Data Science portion of the course.
pyenv install anaconda3-2019.10
Note: This can take 10 minutes or even longer!
Here, we’re installing the October 2019 version of Anaconda3 (The 3 means it’s based on Python 3), which is the latest version as of this writing.
After it’s finished installing, verify that Anaconda installed properly by executing:
PYENV_VERSION=anaconda3-2019.10 conda --version
and the Terminal should output conda 4.7.12 (minor differences are fine).
Fin!
Protip: You can exit the Terminal by typing exit in the Terminal.
Installation Success!
Now Python is installed and we’re ready to take on the course!