Installfest - Python Programming Live Online
MacOS Instructions
Last updated: January 13, 2020
It’s not easy to get your computer ready for programming, especially for Python. If one does not take great care with building their Python programming environment, this can easily happen, as illustrated by the great XKCD:
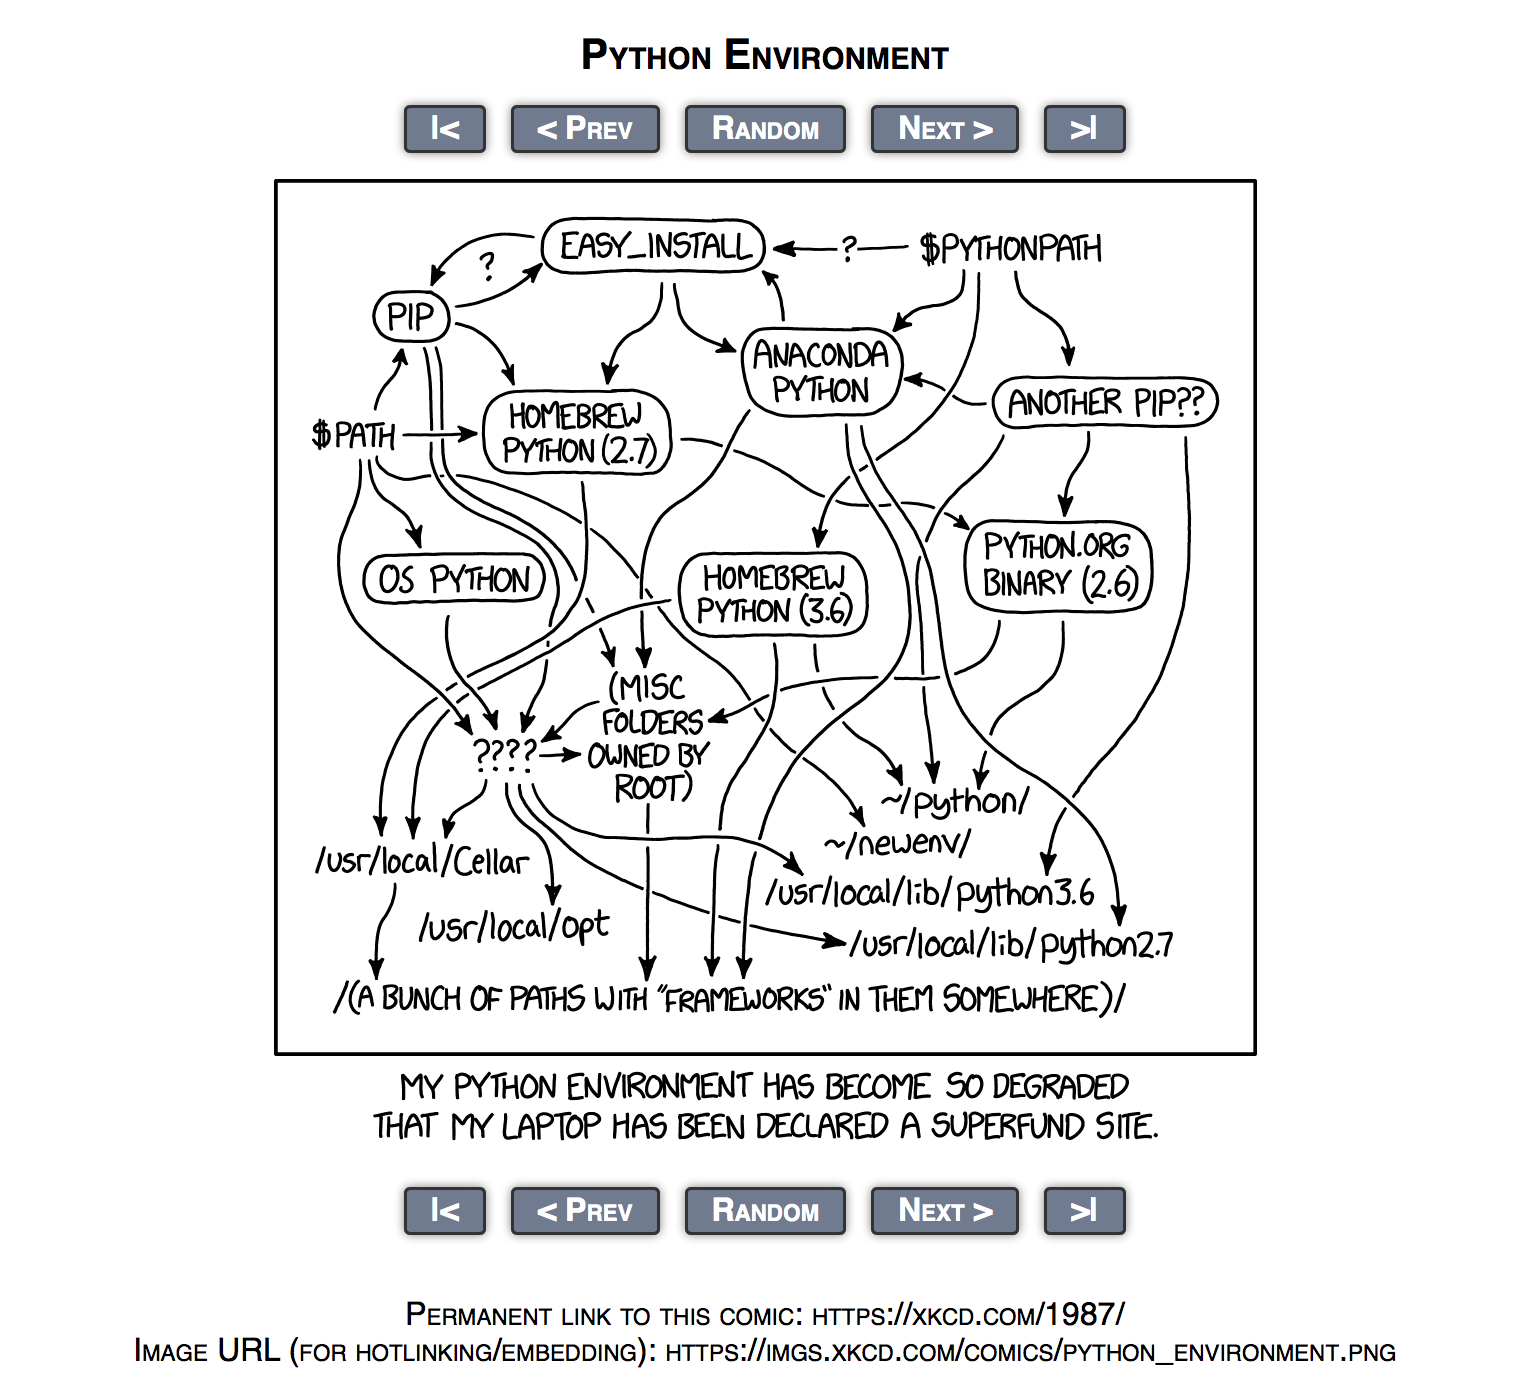
Unfortunately this process can be bewildering for a beginner. Luckily, you are not on your own!
There are many amateurish ways to install Python but in this course we will install Python in the most modern and professional way – that is, how it’s installed at actual companies that use Python as their primary programming language!
The Importance of Reading
A word of advice as you progress through this installation guide: Please read every section before typing anything in – I promise that will prevent a lot of pain!
Technical Requirements
This guide is written assuming you are running Mojave 10.14 or Catalina 10.15. If you are running an earlier MacOS, you should upgrade before proceeding. We’ll be waiting for you right here.
Administrator Privileges Required
You need Administrator Privileges on your machine in order to install software.
If you don’t have administrator privileges (if you are using a work machine, for instance), you will need to speak with your company’s IT administrator about granting you permission to install developer software on your machine, so that you are able to complete the course.
Update MacOS
Before continuing, fully update your Mac by going to the App Store. You’ll need to be fully updated before you can continue. This can take a while if you haven’t updated recently! Again we’ll wait right here.
Zoom Permissions
First, you must give the Zoom conferencing app all the permissions it needs to do its thing.
- Click the Apple logo at the top left corner of your screen
-
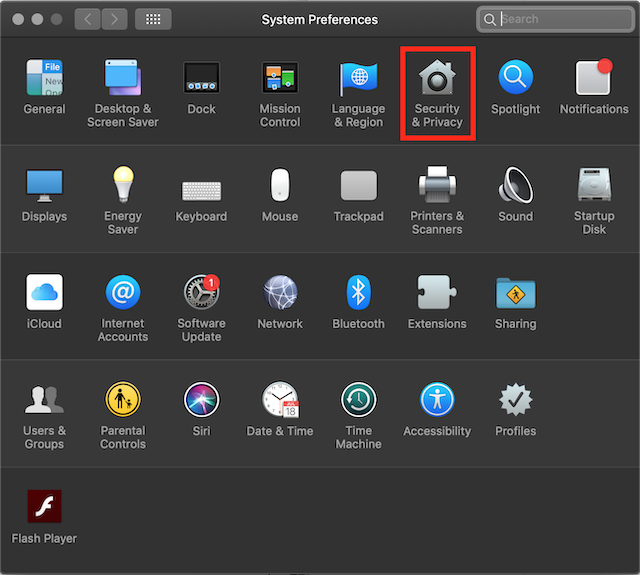
Click System Preferences

-
Click Security & Privacy
-
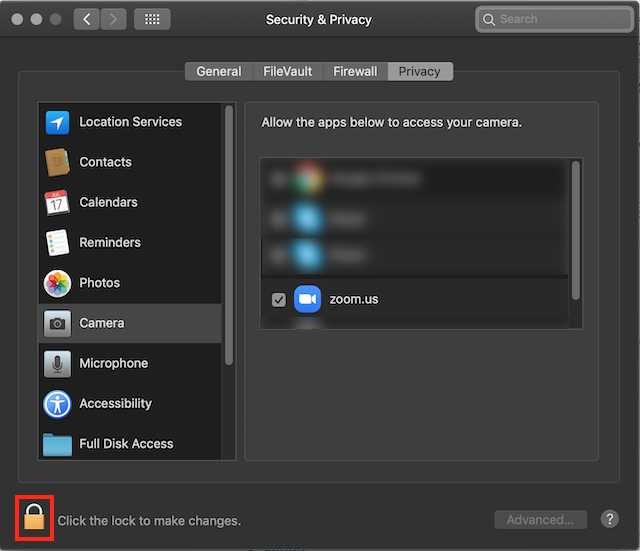
Click the lock icon at the bottom left corner of the Security & Privacy window
-
Enter your OS administrator username and password, and click Unlock

-
Go through every one of the following: Camera, Microphone, Screen Recording, Files and Folders and Accessibility.
For each of them, make sure the checkbox next to zoom.us is checked

Now Zoom is ready for the course!
Update Your Shell
We’re not going to get overly technical here, but a bit of background is necessary.
Catalina made a major change of switching the default “Shell” program to zsh, whereas bash was the default shell for more than a decade.
Even though you may not know what a shell is for right now, just know that this is a very large change when it comes to the programming world!
To make things even more complicated, if you upgraded to Catalina (or upgraded an existing account to a new Mac), bash is still your default shell, whereas if you freshly installed Catalina, then zsh is your default shell! Argh!
Either way, we will standardize on zsh, no matter whether you are on Catalina or Mojave.
First, check your shell.
Open the Terminal program. You can find it in the Other folder in Launchpad.
Run the following:
echo $SHELL
It should respond one of the following:
-
If it said
/bin/zsh, you’re good to go! Continue to the next section. -
If it said
/bin/bash, then run:chsh -s /bin/zshIt will ask you to type your Mac password. Go ahead and type it in. For security reasons, you won’t see your password as it’s being typed in, so just be careful about typing it in exactly correctly.
Close your Terminal to have the change take effect.
Create a Working Folder
We’ll need a place to do our work in this course.
On MacOS, the best place to put your work is in the Documents folder.
Open the Terminal program. You can find it in the Other folder in Launchpad.
Run the following:
cd ~/Documents
For Catalina Only: MacOS might ask you for permission to access the Documents folder. Say yes, of course.
Now that you’re in the Documents folder, create a sub-folder for your development activities:
mkdir dev
cd dev
Verify the present working directory:
pwd
It should show something like /Users/YOUR_USER_NAME/Documents/dev
Let’s make a shortcut so it’s easy to get back to here:
echo "DEV=~/Documents/dev" >> ~/.zprofile
source ~/.zprofile
Now, it’ll be easy to get back to your Dev folder anytime by typing:
cd $DEV
Make sure to type in the upper-case characters. CaPiTaLiZaTiOn Matters!
Install Programming Tools
XCode and Command Line Tools
We need to install the tools that allow us to compile programs specifically for your machine. These are provided by Apple and are pretty easy to install.
Open the Terminal program.
Enter the following command on the command line.
xcode-select --install
It will pop up a dialog box like the following.
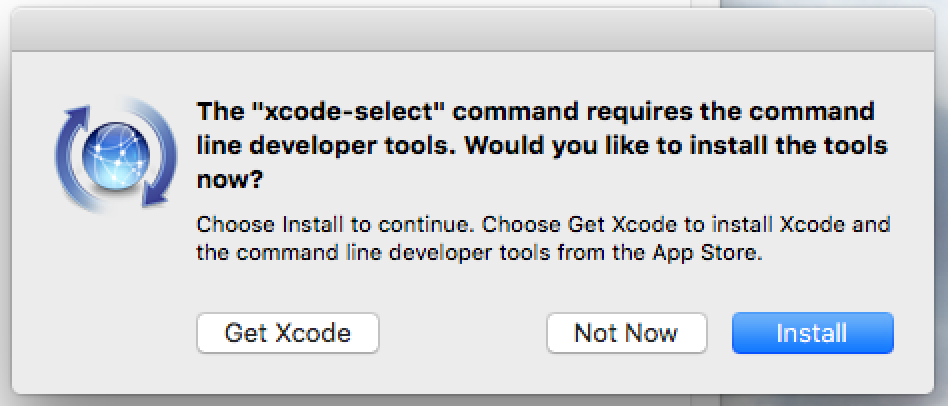
Click Install and Agree to proceed. It is going to take a few minutes to complete.
To prove that it successfully installed, run the following command:
xcode-select -p
It should say something like /Library/Developer/CommandLineTools.
Homebrew
Next we’ll install Homebrew, a package manager which we’ll use to install most of our other required command-line tools. It’s a much more convenient alternative to manually installing everything.
To install Homebrew, copy, paste and run the following:
ruby -e "$(curl -fsSL https://raw.githubusercontent.com/Homebrew/install/master/install)"
Follow the prompts. You’ll have to enter your Mac password to continue the installation.
Once Homebrew is installed, to make sure it is installed correctly, run:
brew doctor
It should say Your system is ready to brew.
If not, it probably means someone has tried to install development stuff on your computer before and it’s getting confused. ![]() STOP HERE and ask your instructor for help!
STOP HERE and ask your instructor for help!
Git
Upgrade your Git software via Homebrew:
brew install git
Now, close and reopen your Terminal.
Check that Git was upgraded to the latest version:
git --version
It should output something like git version 2.23.0.
Now set some Git configurations. Replace you@example.com and Your Name with your actual email address and name, of course…
git config --global user.email "you@example.com"
git config --global user.name "Your Name"
git config --global core.editor "code -n --wait"
Code Editor
Visual Studio Code is probably the most popular code editor as of this writing and it is the one we will use in this course.
You can use another code editor if you prefer, but VS Code will be tightly integrated into in-class examples, and it’s free!
It’s easy to install VS Code with Homebrew:
brew cask install visual-studio-code
Wait for the installation to be complete. Now, let’s check to see that the latest version was installed:
code -v
It should output something like:
1.40.1
8795a9889db74563ddd43eb0a897a2384129a619
x64
It doesn’t matter if the output is exactly the same, as long as it’s similar.
VS Code will now also appear in your launchpad, where you can launch the app.
For Catalina Only, there is currently an open issue that may prevent VS Code from launching. If Catalina prevents you from launching VS Code, please follow the workaround documented here. According to Microsoft, the ETA for this bug fix is January 2020, which as of this writing is still not fixed…
Pyenv
The most professional Python installation is achieved using Pyenv, as it allows us to avoid version collision problems and upgrade difficulties.
Install Pyenv with the following line:
brew install pyenv
Now that Pyenv is installed, let’s activate it. Run the following in Terminal.
Be sure to type (or copy and paste) every character EXACTLY!!!
echo "eval \"\$(pyenv init -)\"" >> ~/.zprofile
source ~/.zprofile
Install Python
Finally we are ready to install Python!
pyenv install 3.8.1
We shall set this version as the default:
pyenv global 3.8.1
Now, close and reopen your Terminal.
Check to make sure the latest version of Python is installed properly:
python --version
It should output something like Python 3.8.1.
While you’re at it, upgrade pip. This is a tool we’ll be using to install Python packages later.
pip install --upgrade pip
Check to see that the latest version was installed:
pip --version
It should output something like pip 19.3.1 from /Users/jane/.pyenv/versions/3.8.1/lib/python3.8/site-packages/pip (python 3.8).
Install Anaconda
Finally, we’ll install Anaconda, which we will need for the Data Science portion of the course.
pyenv install anaconda3-2019.10
Note: This can take 10 minutes or even longer!
Here, we’re installing the October 2019 version of Anaconda3 (The 3 means it’s based on Python 3), which is the latest version as of this writing.
After it’s finished installing, verify that Anaconda installed properly by executing:
PYENV_VERSION=anaconda3-2019.10 conda --version
and the Terminal should output conda 4.7.12 (minor differences are fine).
Fin!
Protip: You can exit the Terminal by typing exit in the Terminal.
Installation Success!
Protip: You can exit the Terminal by typing exit in the Terminal.
Now Python is installed and we’re ready to take on the course!